Warning: Undefined array key "cperpage" in /www/wwwroot/www.now163.com/wp-content/themes/twentytwentyfive/functions.php on line 255

Warning: Undefined variable $output in /www/wwwroot/www.now163.com/wp-content/themes/twentytwentyfive/functions.php on line 325

Warning: Undefined variable $fixed_tags in /www/wwwroot/www.now163.com/wp-content/themes/twentytwentyfive/functions.php on line 326

Warning: Undefined variable $isshowdots in /www/wwwroot/www.now163.com/wp-content/themes/twentytwentyfive/functions.php on line 327

Warning: Undefined variable $tag_aditional in /www/wwwroot/www.now163.com/wp-content/themes/twentytwentyfive/functions.php on line 330

Warning: Undefined variable $tag_aditional in /www/wwwroot/www.now163.com/wp-content/themes/twentytwentyfive/functions.php on line 333

Warning: Undefined variable $tag_aditional in /www/wwwroot/www.now163.com/wp-content/themes/twentytwentyfive/functions.php on line 336

Warning: Undefined variable $post in /www/wwwroot/www.now163.com/wp-content/themes/twentytwentyfive/functions.php on line 345

Warning: Attempt to read property "ID" on null in /www/wwwroot/www.now163.com/wp-content/themes/twentytwentyfive/functions.php on line 345

Warning: Undefined variable $post in /www/wwwroot/www.now163.com/wp-content/themes/twentytwentyfive/functions.php on line 345

Warning: Attempt to read property "ID" on null in /www/wwwroot/www.now163.com/wp-content/themes/twentytwentyfive/functions.php on line 345

Warning: Undefined variable $more_text_link in /www/wwwroot/www.now163.com/wp-content/themes/twentytwentyfive/functions.php on line 345
Linux – 理想社会

分类: Linux

  • centos7安装cmake3版本

    1、首先安装编译需要的工具包:

    yum install -y gcc gcc-c++ make automake wget

    2、去https://cmake.org/files/下载需要的cmake版本

    3、解压cmake3.xx.x,进入源码文件夹

    tar zxvf cmake3.xx.x && cd cmake3.xx.x

    4、运行booststrap

    ./bootstrap

    5、编译

    gmake

    6、安装

    gmake install

    安装完成后可以通过cmake –version查看当前的版本。

  • 批量设置用户quota磁盘配额

    1、先给一个已存在的用户建好配额:

    a:修改/etc/fstab文件(如:LABEL=/     /  ext3  defaults,usrquota,grquota    1   1)

    b:重新启动系统使设置生效:reboot

    c:创建配额文件:quotacheck -cmug / (查看已建立的配额文件:ls /aquota.*)

    d:设置配额:edquota -u 用户名

    使用quota -u 用户名查询配额

    repquota -u /  显示配额

    quotaoff |on -auvg关闭或开启配额

    2、#users=`awk ‘BEGIN {FS=”:”} {if ($3>500) print $1}’ /etc/passwd`(第一个和最后一个符号是 `反撇号即esc下面的键)

    3、显示上面的赋值:echo $users

    4、edquota -p 用户名 $users

  • ubuntu20.04 bind 服务添加日志信息

    网络中心发来了实验室内挖矿的记录,要求排查。看记录的日志是通过dns查询来判断是否有挖矿行为的。

    我们有自建DNS服务器。开启日志记录,就可以查到是哪一台内网机器在挖矿了。

    在named.conf添加如下信息开启日志记录。

    logging {
    channel query_log { #这段是对日志文件的定义
    file “query.log” versions 5 size 20m; #定义文件名,文件大小
    severity info; #日志级别
    print-time yes; #是否输出日期
    print-category yes; #是否输出日志类型
    };
    category queries {
    query_log;
    };
    };

    修改后保存,重启一下bind服务。

    systemctl restart bind9

    query_log默认会保存在/var/cache/bind下。


  • Linux logout all other users

    Linux logout all other users

    If you would like to logout other users, you must login as root user. Next you need to use the pkill command.

    pkill command syntax

    The syntax is:

    pkill -KILL -u {username}

    Warning: Do not kill root user or other system level user process. The following example, will kill all process on your server. Do not run the pkill for root user:
    pkill -KILL -u root

    To see list of logged in user type who or w command:
    # who
    OR
    # w
    To logout a user called raj, enter:
    # pkill -KILL -u raj
    OR
    $ sudo pkill -KILL -u raj

  • Linux下批量创建删除账号

    1、批量创建用户

    cat adduser.sh 
    #!/bin/bash
    #
    for username in $(more users.list)
    do
    if [ -n $username ]
    then
    useradd $username -g student -d /pub/home/$username
    echo
    echo $username"xyz" | passwd --stdin $username
    chage -d 0 $username
    echo $username "has been created!"
    else
    echo "The username is null!"
    fi
    done

    2、批量删除用户

    cat deluser.sh 
    #!/bin/bash
    #
    for username in $(more users.list)
    do
    if [ -n $username ]
    then
     userdel $username
     echo
     echo $username "has been deleted!"
    else
     echo "The username is null!"
    fi
    done
    

    3、创建users.list,将需要批量创建的有用户填入,一行一个。

  • ipmitool启动报错,提示No such file or directory

    当提示:

    [root@localhost ~]# ipmitool sdr
    Could not open device at /dev/ipmi0 or /dev/ipmi/0 or /dev/ipmidev/0: No such file or directory
    Get Device ID command failed
    Unable to open SDR for reading

    需要添加如下:

    [root@localhost ~]# modprobe ipmi_watchdog
    [root@localhost ~]# modprobe ipmi_poweroff
    [root@localhost ~]# modprobe ipmi_devintf
    [root@localhost ~]# modprobe ipmi_si
    [root@localhost ~]# modprobe ipmi_msghandler

    当添加ipmi_si时,提示:

    FATAL: Error inserting ipmi_si (/lib/modules/2.6.9-5.ELsmp/kernel/drivers/char/ipmi/ipmi_si.ko): No   such device

    这是因为机器上没有IPMI设备而出现的报错。

  • Exchange2013中断POP3和IMAP4的解决办法

    Exchange2013中断POP3和IMAP4的解决办法

    Exchange服务器意外重启。之后用户发现无法通过POP3和IMAP4收邮件,连接后会提示ssl error5。 但是Exchange模式可以用。

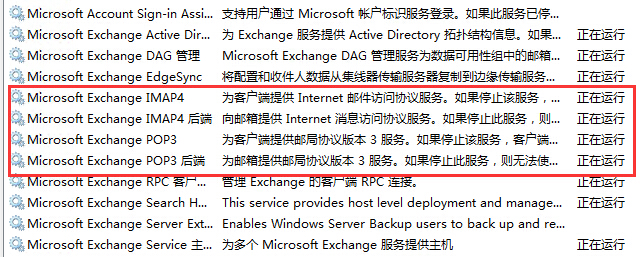
    去服务器上检查,相应的pop3和imap服务均已启动。
    1

    端口是正常的,配置文件也没有变化。

    在服务器上用foxmail测试。地址填写127.0.0.1时却正常。

    【解决办法】

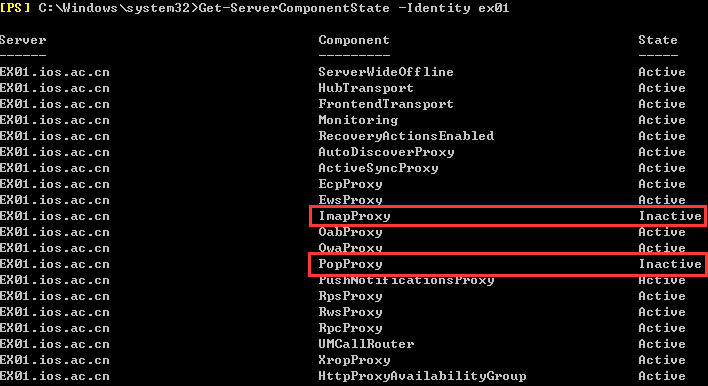
    检查服务器组件: 发现有2个组件处于inactive。
    9

    使用以下命令激活组件

     Set-ServerComponentState -Identity xxmail1 -Component PopProxy  -Requester HealthAPI -State Active

     Set-ServerComponentState -Identity xxmail1 -Component ImapProxy -Requester HealthAPI -State Active

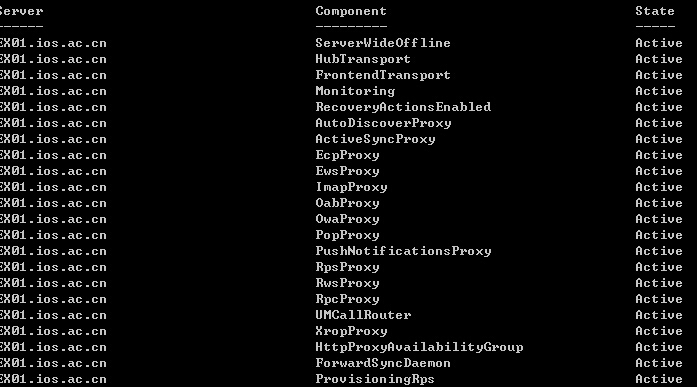
    使用Get-ServerComponentState -Identity ex01 再次查看一下,是否全部为激活状态。
    QQ截图20160505150509

    最后问题解决。


    参考文档:

    https://blogs.technet.microsoft.com/exchange/2013/09/26/server-component-states-in-exchange-2013/

    http://blog.5dmail.net/user1/1/201572216151.html

    http://wenku.baidu.com/link?url=OsXOb5Hu9LHU0YiG-93UOovEcuupTjakAJCYCeslVrkFrDiH4zYpupi-t-QfufFHX0Hj7KNdJ5B4Bs8_Z50D3nLuuUq5Ow31iDWmKSWteo_

  • ubuntu14.04关闭ipv6

    编辑/etc/sysctl.conf

    net.ipv6.conf.all.disable_ipv6 = 1
    net.ipv6.conf.default.disable_ipv6 = 1
    net.ipv6.conf.lo.disable_ipv6 = 1
    net.ipv6.conf.eth0.disable_ipv6 = 1
    

    然后更新一下。

    sudo sysctl -p
    
    接着就可以用 ifconfigip a 命令看看是否已经没有 IPv6 地址了。
  • Openwrt路由器安装KMS服务激活Windows Office

    源地址在这里。

    Emulated KMS Servers on non-Windows platforms

    http://forums.mydigitallife.info/threads/50234-Emulated-KMS-Servers-on-non-Windows-platforms

    它同时提供了一个python版本。不受系统限制。可以安装在任意支持python(2.6 higher)的系统上。

    把它放到Openwrt路由器里,实现自动对局域网内机器进行Windows,Office进行激活。注意,此脚本需要用掉大概12m内存。我用的360路由,显示占用10%内存。 (更多…)

  • Ubuntu14.04 安装pptp服务

    apt-get install pptpd

    vim /etc/pptpd.conf
    localip 11.22.33.44  #这个就是你当前主机的IP地址
    remoteip 10.0.0.2-100  #这个就是给客户端分配置的IP地址池

    vim /etc/ppp/options
    ms-dns 8.8.8.8
    ms-dns 8.8.4.4
    (更多…)